
If you’ve ever scrolled through a long spreadsheet and lost track of your headings, you’re not alone. I’ve been there too—scrolling up and down just to check column titles. That’s where learning how to freeze a row in excel becomes a total game-changer. It’s a simple feature, but it makes your work faster, cleaner, and less frustrating.
In this guide, I’ll walk you through everything step by step. You’ll learn not just how to freeze rows, but also how to freeze columns, multiple rows, and even how it works on Mac. Whether you’re a beginner or someone who just needs a quick refresher, this guide will help you master it easily.
What Does Freezing a Row in Excel Mean?
Freezing a row means keeping it visible while you scroll down your spreadsheet. This is especially helpful when your data is long and detailed. Usually, the top row contains headers like names, dates, or categories. When you freeze it, those headers stay fixed.
In Microsoft Excel, this feature is part of the “Freeze Panes” option. It locks selected rows or columns in place.
Imagine working with 1,000 rows of data. Without freezing, you’ll forget what each column means. But once frozen, your top row stays visible, no matter how far you scroll.
Why You Should Learn How to Freeze a Row in Excel
Freezing rows saves time and reduces mistakes. It keeps your data organized and easy to read. When you always see your headers, you don’t need to scroll back up repeatedly.
Here are some real benefits:
- Better data clarity
- Faster navigation
- Reduced errors in data entry
- Improved productivity
I personally use this when working with client reports. It helps me stay focused and avoids confusion.
How to Freeze a Row in Excel (Step-by-Step)
Let’s start with the most common task: freezing the top row.
Steps:
- Open your Excel file
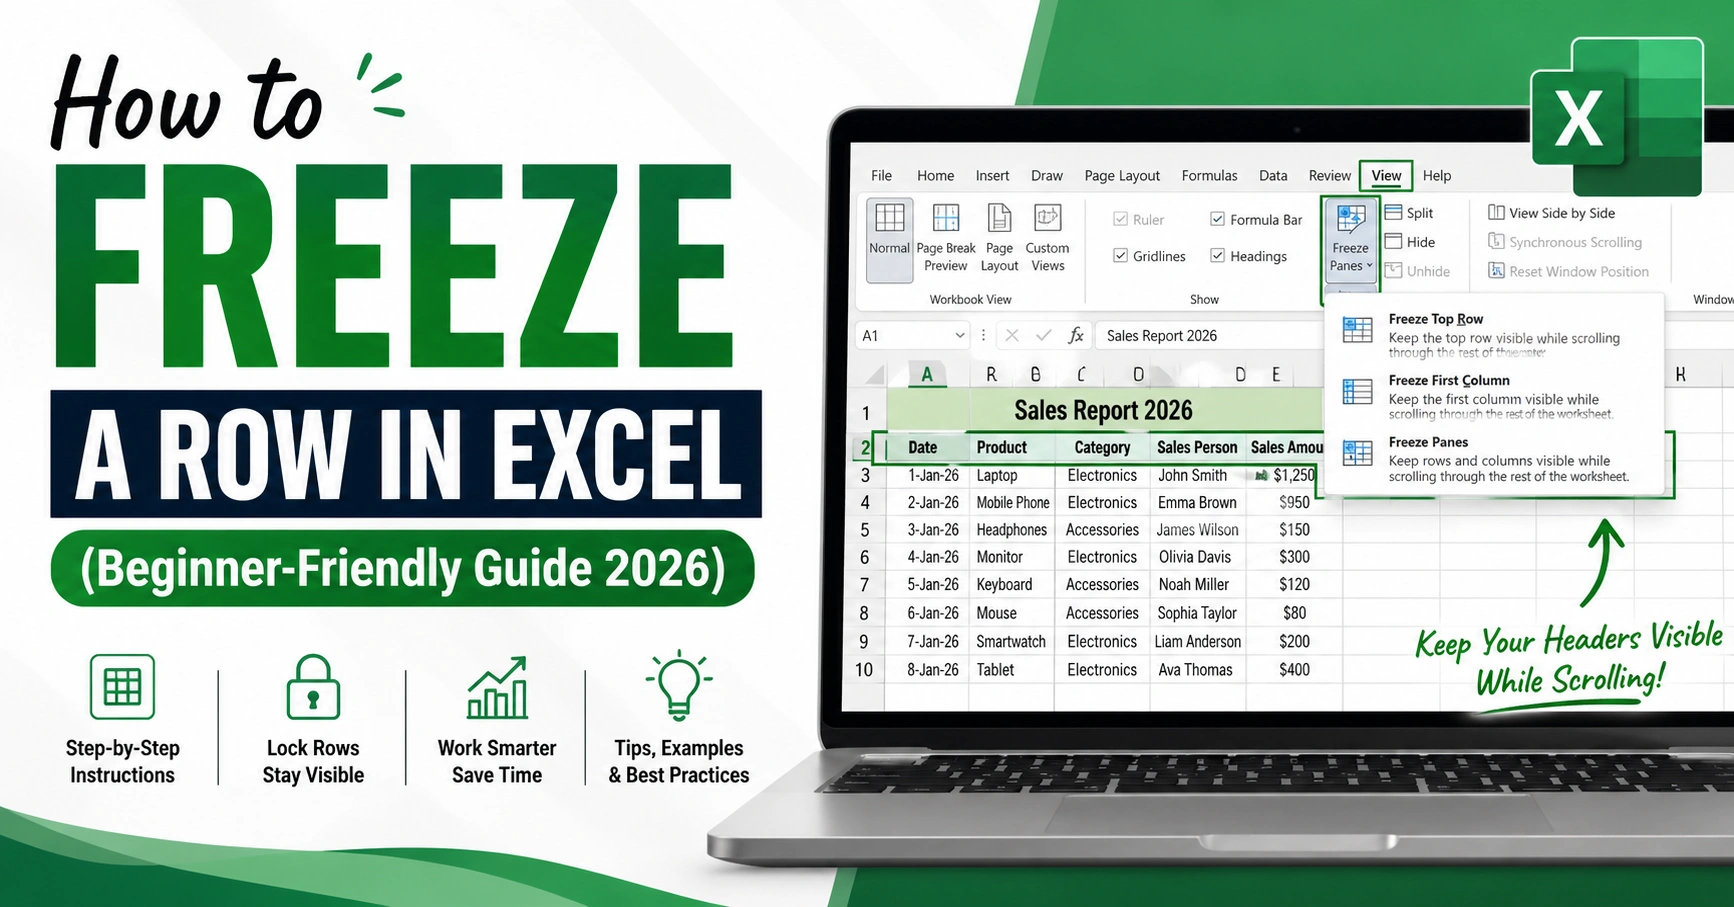
- Click on the View tab
- Select Freeze Panes
- Click Freeze Top Row
That’s it! Now your top row will stay visible while scrolling.
Table: Basic Freeze Options in Excel
| Feature | What It Does | Best Use Case |
|---|---|---|
| Freeze Top Row | Locks first row | Headers always visible |
| Freeze First Column | Locks first column | Names or IDs |
| Freeze Panes | Custom freeze | Rows + columns |
How to Freeze a Specific Row in Excel
Sometimes you don’t want just the top row. You may want to freeze a particular row, like row 3 or 5.
Steps:
- Click the row below the one you want to freeze
- Go to View → Freeze Panes
- Select Freeze Panes
For example, if you want to freeze row 3, click row 4 first.
This method works great when your headers are not in the first row.
How to Freeze a Row and Column in Excel
You can also freeze both a row and a column at the same time. This is useful when you want headers and side labels visible.
Steps:
- Click the cell below the row and right of the column
- Go to View tab
- Click Freeze Panes → Freeze Panes
Example:
To freeze row 1 and column A, click cell B2.
Table: Freezing Rows and Columns Example
| Action | Cell to Select | Result |
|---|---|---|
| Freeze row 1 | A2 | Top row locked |
| Freeze column A | B1 | First column locked |
| Freeze both | B2 | Row 1 + Column A locked |
How to Freeze a Column and Row in Excel Together
This is similar to the previous method but often confused.
To freeze both:
- Choose the right cell position
- Use “Freeze Panes” instead of “Freeze Top Row”
It’s powerful when working with large financial sheets or reports.
How to Freeze a Row or Column in Excel
You don’t always need both. Sometimes just one is enough.
Options:
- Freeze only row → use “Freeze Top Row”
- Freeze only column → use “Freeze First Column”
This flexibility helps you customize your view.
Common Mistakes When Freezing Rows
Many users make small mistakes that cause confusion. I’ve done these too!
Common errors:
- Selecting the wrong cell
- Using “Freeze Top Row” instead of “Freeze Panes”
- Forgetting to unfreeze before changing settings
If things don’t work, double-check your selected cell.
Table: Common Errors and Fixes
| Problem | Cause | Solution |
|---|---|---|
| Wrong row frozen | Wrong selection | Select correct row |
| Freeze not working | Already frozen | Unfreeze first |
| Column not freezing | Wrong option used | Use Freeze Panes |
How to Unfreeze Rows in Excel
If you want to remove freezing:
Steps:
- Go to View tab
- Click Freeze Panes
- Select Unfreeze Panes
This resets everything.
How to Freeze a Row in Excel for Mac
If you’re using a Mac, don’t worry. The process is almost the same.
Steps:
- Open Excel on Mac
- Click Layout or View tab
- Choose Freeze Panes
- Select your option
So yes, how to freeze a row in excel mac is just as simple.
Real-Life Example of Freezing Rows
Let’s say you’re tracking sales data.
Your sheet has:
- Row 1 → Headers (Product, Price, Quantity)
- Rows 2–500 → Data
Without freezing, headers disappear when scrolling.
After using how to freeze a row in excel, your headers stay visible. This makes analysis faster and easier.
Advanced Tips for Better Use
Once you understand the basics, try these:
- Freeze multiple rows using Freeze Panes
- Combine freezing with filters
- Use split view for complex data
These tricks improve workflow and efficiency.
When You Should Use Freeze Panes
Use freezing when:
- Working with long datasets
- Creating reports
- Comparing rows and columns
- Managing financial or business data
Avoid it when your sheet is very small. It’s not needed there.
FAQs About How to Freeze a Row in Excel
1. Can I freeze more than one row in Excel?
Yes. Use “Freeze Panes” and select the row below your desired rows.
2. Why is freeze panes not working?
You may have already frozen something. Try unfreezing first.
3. How do I freeze a particular row in excel?
Click the row below it, then use “Freeze Panes.”
4. Can I freeze rows and columns together?
Yes, just select the correct cell and use Freeze Panes.
5. How to freeze a row in excel on mac?
Use the same steps under the View tab on Mac.
6. Is freezing permanent?
No. You can unfreeze anytime.
Conclusion: Master Excel Like a Pro
Learning how to freeze a row in excel may seem small, but it makes a big difference. It keeps your data organized, saves time, and helps you work smarter.
Once you get comfortable with freezing rows, try freezing columns and using advanced features. These small improvements can boost your productivity a lot.
If you use Excel daily, this is a must-know skill. Try it today on your own spreadsheet and see the difference.
And if you found this guide helpful, keep exploring more Excel tips—you’ll become faster and more confident with every step.