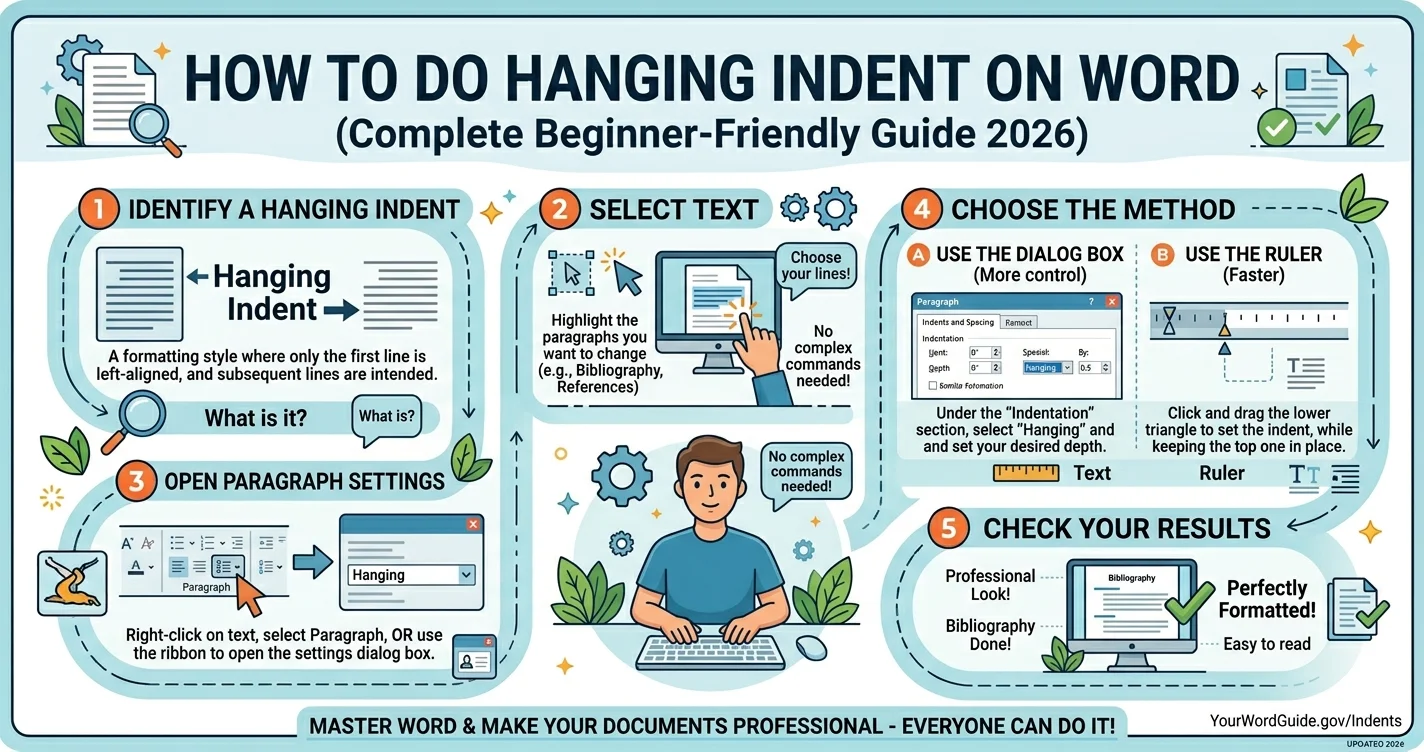
If you’ve ever worked on essays, research papers, or bibliographies, you’ve likely seen a format where the first line starts at the margin, but the rest of the lines are pushed inward. That format is called a hanging indent—and it’s very common in academic writing.
In this simple and friendly guide, you’ll learn exactly how to do hanging indent on Word, step by step. Whether you’re using Windows or Mac, this article will walk you through everything in a clear way.
By the end, you’ll feel confident using hanging indents like a pro—even if you’re a complete beginner.
What Is a Hanging Indent?
A hanging indent is a paragraph style where:
- The first line stays aligned to the left margin
- All other lines are indented inward
This format is commonly used in:
- References or bibliographies
- MLA, APA, and Chicago styles
- Lists with long descriptions
Example:
| Line Type | Alignment |
|---|---|
| First line | Left margin |
| Second line | Indented inward |
| Third line | Indented inward |
Think of it like this: the first line “hangs” out, while the rest move in.
Why You Should Use Hanging Indents
Hanging indents are not just for looks—they serve a purpose.
They make your content easier to read, especially when you have long lists or references.
Here’s why they matter:
| Benefit | Explanation |
|---|---|
| Better readability | Easy to scan references quickly |
| Professional formatting | Required in academic writing |
| Organized structure | Keeps lists clean and neat |
When I first started writing assignments, I ignored formatting. But once I learned how to do a hanging indent on Word, my work looked instantly more polished.
How to Do Hanging Indent on Word (Windows Method)
Let’s start with the most common method using Microsoft Word on Windows.
Step-by-Step Guide:
- Highlight the paragraph you want to format
- Right-click and choose Paragraph
- Find the “Indentation” section
- Click the dropdown next to “Special”
- Select Hanging
- Choose the indent size (usually 0.5 inches)
- Click OK
That’s it! You’ve successfully learned how to do hanging indent on word.
Quick Shortcut Method (Ruler Tool)
If you want a faster way, try using the ruler.
Steps:
- Turn on the ruler (View → Ruler)
- Select your text
- On the ruler:
- Drag the bottom triangle to the right
- Keep the top triangle in place
Visual Breakdown:
| Ruler Marker | Function |
|---|---|
| Top triangle | First line indent |
| Bottom triangle | Hanging indent control |
This method is quick once you get used to it.
How to Do a Hanging Indent on Word on Mac
If you’re using a Mac, the process is very similar.
Steps for Mac Users:
- Highlight your text
- Click Format in the top menu
- Select Paragraph
- Under “Special Indent,” choose Hanging
- Set the indent value
- Click OK
That’s how you can easily learn how to do a hanging indent on word on mac without confusion.
Using the Paragraph Dialog Box (Detailed Method)
This method gives you more control.
Instructions:
- Select your paragraph
- Open the Paragraph dialog box
- Under “Indentation”:
- Special: Hanging
- By: 0.5 inches
Settings Table:
| Setting | Value |
|---|---|
| Alignment | Left |
| Special indent | Hanging |
| Indent size | 0.5 inches |
This is the most precise way to apply formatting.
How to Apply Hanging Indent for Bibliographies
Hanging indents are widely used in citations.
Example Use Cases:
- APA references
- MLA Works Cited
- Research papers
When writing references:
- First line = author name
- Next lines = indented details
Sample Structure:
| Element | Format Example |
|---|---|
| Author | Starts at margin |
| Title | Indented line |
| Publisher | Indented line |
If you’re writing academic work, mastering how to do a hanging indentation on Microsoft Word is essential.
Common Mistakes to Avoid
Even simple formatting can go wrong.
Here are common errors:
- Using spaces instead of indent tools
- Moving both triangles on the ruler
- Forgetting to highlight text first
- Applying indent to wrong section
Fix Tip:
Always use built-in tools instead of manual spacing.
How to Remove a Hanging Indent
Sometimes you may want to remove it.
Steps:
- Highlight the text
- Go to Paragraph settings
- Change “Special” to None
- Click OK
Quick Reset Table:
| Action | Result |
|---|---|
| Special = None | Removes indent |
| Reset ruler | Aligns text left |
When Should You Use Hanging Indents?
Not every paragraph needs it.
Use hanging indents when:
- Writing references
- Creating lists
- Formatting citations
- Organizing long text blocks
Avoid using them in normal paragraphs unless needed.
Tips to Make Formatting Easier
Here are some helpful tricks:
- Use styles in Word for repeated formatting
- Save templates for future use
- Practice with small text first
From personal experience, saving a template saved me hours of formatting work.
Keyboard Shortcut Tricks (Bonus)
While there’s no direct shortcut for hanging indent, you can speed things up:
- Use Ctrl + T (Windows) for quick indent
- Use Cmd + T (Mac)
These shortcuts help when formatting quickly.
Difference Between Hanging Indent and First Line Indent
It’s easy to confuse these two.
Comparison Table:
| Feature | Hanging Indent | First Line Indent |
|---|---|---|
| First line | At margin | Indented |
| Other lines | Indented | At margin |
| Common use | References | Paragraph writing |
Knowing the difference helps avoid formatting mistakes.
Real-Life Example of Hanging Indent
Let’s say you’re writing a reference:
Without Hanging Indent:
All lines start at the same point.
With Hanging Indent:
First line starts left, others shift right.
This small change makes your document look clean and professional.
FAQs About Hanging Indent on Word
1. What is the easiest way to create a hanging indent?
The easiest way is using the Paragraph settings and selecting “Hanging.”
2. Can I use hanging indent on Word Mac?
Yes, the steps are almost the same. Just use the Format menu.
3. Why is my hanging indent not working?
Make sure your text is selected before applying the setting.
4. What size should a hanging indent be?
Most styles use 0.5 inches as the standard size.
5. Can I apply it to multiple paragraphs?
Yes, select all paragraphs before applying the indent.
6. Is hanging indent required in APA format?
Yes, APA style requires hanging indents in references.
Final Thoughts
Learning how to do hanging indent on word might seem small, but it makes a big difference in your writing. It improves readability, gives your work a professional look, and helps meet academic standards.
Whether you’re using Windows or Mac, the steps are simple once you understand them. With a bit of practice, this formatting will become second nature.
If you’re working on assignments, reports, or research papers, start using hanging indents today. Your documents will instantly look more polished and easier to read.